Server Edition table accessibility
Fixing accessibility issues in tables
Fixing accessibility issues in tables involves similar steps to those for images, i.e. clicking the relevant issue in the Accessibility Issues list and adding or editing properties in a dialogue box.
Missing caption or summary
Note that RiverDocs flags both a missing caption or summary as a missing caption. This is because one or the other is necessary for acccessibility under the WCAG 1.0 Guidelines a summary is required if a caption is not provided. The <title> attribute can serve as a substitute for the caption. Both a summary and a caption are short descriptive texts that clarify the table. A caption, which can consist of one to three short sentences, is a separate HTML element (<caption>) that should be placed immediately before the <table> element in code, and is displayed on screen, whereas a summary is an attribute of the <table> element like an alt text and is only read by screen readers, (which despite their name read the HTML code, not the screen). The summary describes the meaning or purpose of the table, including its context if appropriate and information on its structure if that is necessary to convey the meaning. Summaries usually consist of a few words, but can be longer, e.g. 80-100 words.
When the Converter detects missing table captions or summaries during conversion it automatically searches nearby text for captions and inserts them as table summaries when they are analysed as suitable. Where no suitable caption is found, an accessibility issue warning for a missing caption is displayed. You need to insert captions or summaries for those tables.
In the example shown, table 3-1 in the document had no caption or summary.
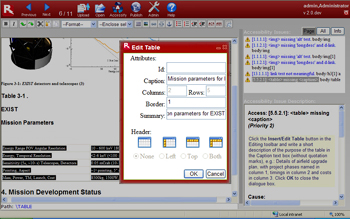
To correct this, you carry out the following steps:
- In the Page issues list, click the accessibility warning 5.5.2.1 <table> missing caption. The table is displayed in the Editing pane and selected. At the same time, "TABLE" is displayed in the Path display at the foot of the Editing pane, which also indicates the table's position in the HTML structure of the page.
- Click the Insert/Edit table button.
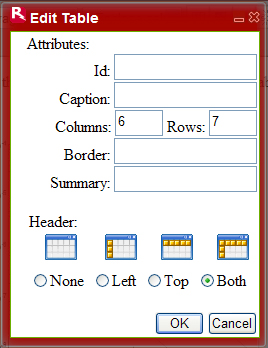
 The Edit Table dialogue box is displayed. At this stage, the Summary text box is empty.
- Type a suitable caption into the Caption text box, and also enter a summary in the Summary text box. For this example, in both cases we can use "Mission parameters for EXIST". Note that with more complex tables, for completeness it may be necessary to summarise the row and column structure as well as the content and purpose, e.g. a sales table might have a summary such as "Annual regional sales in $m, with a row for North America, South America, Europe, Asia, Africa and total sales, and columns for years 2000 through 2007".
As with images, to ensure full accessibility compliance it is also recommended that you inspect the other tables during the editing session to verify that any automatically inserted summary text is suitable. You can then use the Accessify button to check whether any issues remain.
Marking row and column headings for accessibility
Headings and meaning
If you identify a table as a data table that is one not used solely for visual layout, you should mark the row and column headings if the Converter has not already done so automatically. In data tables, headings are not just a matter of orderly layout. The meaning of data in most cells of the table, and that of the whole table usually depends on heading information, which is typically in the first row and/or the first column of the table. You may not understand what the data means if the columns or rows have no headings. For example, a column of figures means little unless the heading indicates that it represents (say) sums in a given currency, temperature readings etc..
Why headings help assistive technology
Table cells may contain two types of information: header information and data. This distinction enables user agents to render header and data cells distinctly, even in the absence of style sheets. For example, visual user agents may present header cell text with a bold font. Speech synthesizers may render header information with a distinct voice inflection.
How to mark up headings with RiverDocs Converter
To identify header cells, use the Path interactive display tool and Insert/Edit table button as follows:
In the editing pane, place your cursor inside the table. The Path display at the foot of the pane will display something like this:

Each element in the display acts as a selection button.
|  |
By clicking the header options, you change the tag code of the heading cells from <td> to <th>, making it possible for screen readers and other assistive technology to distinguish the headings for the user, as well as distinguishing them for the sighted user.
Table without heading markup |
Same table with headings marked up using RiverDocs Both setting |
Choosing the option Both for a simple table changes the mark-up from this:
<table>
<tr>

<td> …</td><td>
    …</td><td> …</td>
</tr>
<table>
<tr>
<td> …</td><td>
    …</td><td> …</td>
</tr>
<table>
<tr>
<td> …</td><td>
    …</td><td> …</td>
</tr>
</table>
To this:
<table>


        <tr>


        <th> …</th><th>
    …</th><th> …</th>
</tr>

<table>
<tr>
<th> …</th><td>
    …</td><td> …</td>
</tr>
<table>
<tr>
<th> …</th><td>
    …</td><td> …</td>
</tr>
</table>
Scope tags
Besides marking cells as headers, RiverDocs applies the scope tag to header cells, as in this example:
<table>
<tr>
<td> …</td><th scope="col">
    …</th><th scope="col">
    …</th>
</tr>
<table>
<tr>
<th scope="row"> …</th><td>
    …</td><td> …</td>
</tr>
<table>
<tr>
<th scope="row"> …</th><td>
    …</td><td> …</td>
</tr>
</table>
The scope tag tells assistive technology unambiguously which cells belong to which headers.
Manual editing of the HTML page code
By clicking the Editing/Source view button and editing the code manually, you can make further edits to table headers to improve accessibility for screen reader users or to change the table's structure or content.
For more complex tables it may be necessary to add the 'colgroup' or 'rowgroup' scope to some cells. Typically this is necessary when a table has two levels of headings.
You can edit the code manually to do this, or to insert id attributes into headers.
