Getting started with the Server Edition
Main operations
This page takes you through the main operations involved in locating, converting, editing and publishing a document file.
Launching RiverDocs Server
RiverDocs Converter™ Server Edition is a web application, and is launched from your Internet Explorer browser (version 6 or higher – 7 recommended).
To launch the application, enter the URL for RiverDocs
Server, e.g.
http://yourdomain.com/rdserver
,
in your browser's location bar and press
Enter. If you do not know the URL, obtain it from your RiverDocs site manual or ask your system administrator.

The RiverDocs
login screen displays.

Enter your username and password, and click the Log In button.
Once you are logged in, you start by uploading or opening a file for conversion.
Converting a file

If your file is already in the default folder that is used for files awaiting conversion, you use the Open button.

For files located in other folders, you click the Upload button.
Uploading
In the main toolbar, click the
Upload
button. The Upload Files dialogue box opens.

Click the
Browse
button and use the Choose file dialogue
box to locate your file.
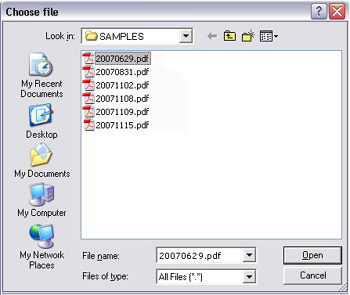
Select the file and click the
Open
button in the dialogue box.
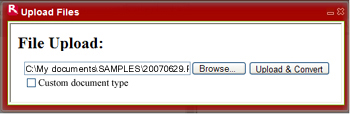
The Upload Files dialogue box displays again, with the pathname of
your file.
Customised conversion
RiverDocs Converter Server Edition can be customised for enhanced automatic conversion of certain document types, which is designed to eliminate the manual editing phase of conversion. If your RiverDocs system has been customised in this way and your file is one of the custom types, select the Custom document type checkbox. The sample illustrated is not a custom type, so the checkbox does not need to be selected.
To proceed, click the Upload &
Convert
button. An animated RiverDocs progress banner displays, and after a few seconds, your document, converted to HTML,
displays in the RiverDocs Converter Editing pane.
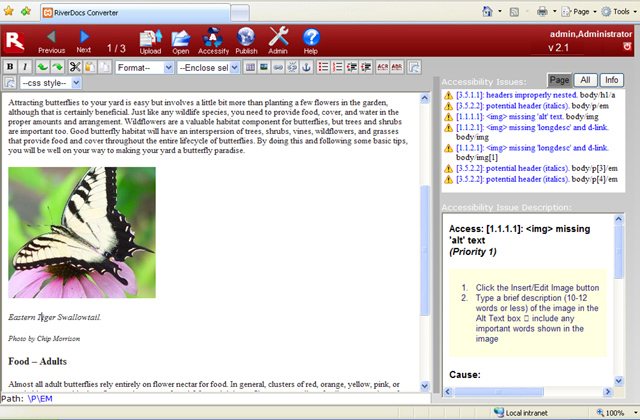
Server Edition main screen, displaying converted document (click for larger image)
Opening a file that has already been uploaded
In the main toolbar, click the Open button. The Open Document dialogue box displays.
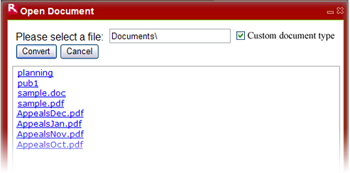
In the Open Document dialogue box,
[a] If you are converting a custom document type, select the
Custom document type
checkbox on the top right of
the dialogue box.
[b] Click the file you wish to convert.
If you have opened a subfolder, e.g. Documents\planning,
and wish to navigate back out of it, click the short dotted
line
..
at the top of the file list.
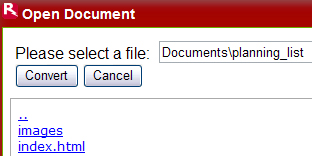
Contents of the HTML folder named "planning" displayed in the Open Document dialogue box, with dotted line for navigating one level up in the folder structure – in this case, to the Documents folder.
Converting your file
When you have located your file, click the Convert button. A RiverDocs processing banner displays during automatic conversion.
After a short time, usually a few seconds, the converted document displays in the Editing pane, with accessibility issues listed in the upper right pane. Click each issue to highlight the affected object (image, table, etc.) in the Editing pane. Use the appropriate editing tool to remedy issues, e.g. for tables or images requiring summaries, captions or alt text, click the Insert/Edit Table or Insert/Edit Image button and enter or accept the required text in the dialogue box that opens.
 Insert/edit image button |
 Insert/edit table button |
For more details, see Fixing image issues and Fixing table issues.
Proofreading
It is recommended that in addition to fixing accessibility issues, you proofread the document before publication to check for misspellings or other errors.
Publishing
When your changes are complete, click the Publish button. The Publish Document dialogue box opens.

In the Publish
Document dialogue box, type a publication name for your file
in the location text box, e.g. planning_jan_07.
Publication options – HTML or ZIP?
The Publish Document dialogue box provides two publishing options, HTML and ZIP. Click HTML if you wish to view your document immediately in a browser window (although it is already displayed in RiverDocs Converter). Click ZIP to publish it in the more compact ZIP form suitable for downloading to your system. The ZIP file is compressed HTML, so once downloaded it can be extracted for web publication.
When you have chosen your publication option, click Publish. If you are using the ZIP option, the Publish Document dialogue box now displays your ZIP file in the list of published documents. At this stage you can close the dialogue box by clicking the Close (x) button at the top right-hand corner of the dialogue box, or you can download the published file by clicking it.
If you have selected the HTML option, the message "Document Published!" is displayed, and you are returned to the RiverDocs Converter main screen.
Viewing the published document
To view your published document immediately, (apart from the HTML preview already provided in the Editing pane) you need to have published it as HTML as described above. To view the stored file, click the Open button to open the Open Document dialogue box. Click the name you assigned to the document, and the folder will open, displaying the converted document's HTML files and images folder.
In the example shown, the HTML folder name is appealsdec110507, and the document only has one page. Each page filename has the format section00000n.html.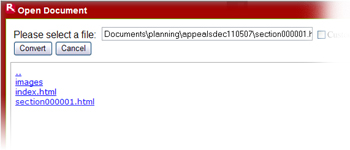
Click index.html to view the table of contents, or the name of a page, e.g. section000001.html to view the converted document itself. The selected page will display in your browser.
Downloading
To download a ZIP file immediately after publishing it, click the ZIP version of your document in the Publish Document dialogue box. Your browser will then display the standard download options Run and Save. Click Run to extract and view the file.
If you want to download the file some time after publishing it, you will need to open and convert any file and click the Publish button in order to open the Publish Document dialogue box, then click the ZIP file you require.
